Tuesday, August 14, 2012

Strawberry Cake: Take 1

Some time ago I stumbled upon a recipe that sounded so delicious--White Chocolate and Fresh Strawberry Bagatelle. I love love love white chocolate and with fresh summer strawberries and cake, well yum! So I had been keeping this recipe on my "must try" list but to be honest I found it very intimidating. Just take a look at the picture and you'll understand why. Well I finally decided to tackle this recipe. I went to Earth Fare to get some high quality white chocolate and I picked up some local strawberries from the farmers market. The recipe calls for 12 ounces white chocolate for the top, but when I looked at the price of white chocolate I quickly decided that 12 ounces was a bit too much. Yes it looks lovely in that picture, but I figured it would be a hard sheet of chocolate on top and not really that edible, so I cut it back to about 2-3 ounces of shavings on top.
Another change I made was that the recipe instructs to bake the cake on a 12 x 18 jellyroll pan and the cut it into circles. I just baked it in 2 cake pans so it made the layers a little bit thicker. Otherwise I followed the recipe. It actually wasn't that difficult. Once the cake layers cooled, I placed one inside the ring of a springform pan, then layered in the cut strawberries, the white chocolate whipped cream, the other cake layer, and the remaining whipped cream. Then I chilled it overnight, removed the cake ring, and topped with the white chocolate curls.
Voila!
This cake was really really good, but I think it could have used more strawberry. The reduced amount of white chocolate on top was perfect.


Next up is another strawberry cake!


Tuesday, May 29, 2012

Tuesdays with Dorie: Pecan Sticky Buns


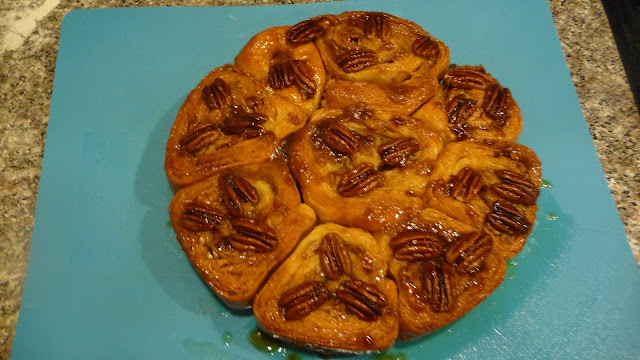
I had to start this post with a picture to show how amazing these sticky buns are. Yum! 
These are quite a bit of work but definitely worth it. I know I haven't made too many recipes from this cookbook yet but these were my favorite so far. 
Please visit our hosts to view the full recipe:  Eat Drink Man Woman Dogs Cat and Nicole of Cookies on Friday.

This first step in this recipe is to make the brioche dough. Once again, I am thankful for my KitchenAid stand mixer. Some bakers made this dough by hand but I cannot imagine having to do all that kneading! It took 15 minutes in my mixer and she was emitting a burning smell but fortunately did not overheat. The brioche recipe makes enough for two batches so I put half in the freezer. 

The next day I tackled the rolling part. I am lacking in counter space in my kitchen so tasks like rolling out dough are always challenging, but I managed. I must say I found the instructions in the book to be extremely vague for someone who is not an experienced baker. I am so glad I watched the clips from the episode on youtube because I would have completed folded the dough wrong. I would always recommend watching a video if it is available! I put my pecan "logs" in the freezer to chill.

After chilling, I cut them into pieces for baking. The recipe recommends 7 rolls per log but I cut mine into 9 pieces, and I think they could have been even smaller, however, you would need to have more prepared pans to bake them in. Once in the pan, the rolls have to rise again, then they can (finally) be baked. 
Ready for the 2nd rise
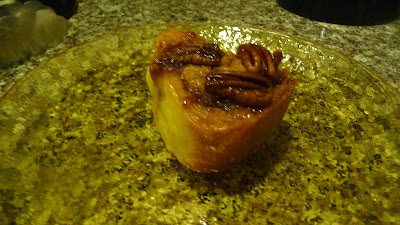
 I really hate having to wait for my treats so this was difficult since it was a multi-day process and I was so excited to see the results. These are SO DELICIOUS and worth the wait. I managed to share one with my friend and she loved it so much she immediately asked for the recipe.


Tuesdays with Dorie: Hungarian Shortbread

Wow, I have been really slack this month, huh? I made both of the TWD recipes but I've just been too lazy to do the write ups. Good thing we have an extra Tuesday this month!
Please visit our lovely hosts to see the full recipe--1smallkitchen and  The not so exciting adventures of a dabbler….
I read all the comments about this recipe in advance so I knew it wouldn't be what I think of as shortbread, a crunchy, buttery, cookie. This are a softer, filled bar and some people liked that aspect but some didn't.
I like to follow the recipes so I made the rhubarb "jam." I had to call around to find the rhubarb since it isn't something commonly found at the markets here. Fortunately Harris Teeter had some! The jam came out much thinner than typical jam--it was more like a puree. I'm not sure if that is how it was supposed to be or not.


I made the jam the day before and then tackled the shortbread dough. This recipe calls for freezing the dough and the grating it in two layers. I thought this was very unusual but I guess it does serve to make the finished product lighter in texture. I used my box grater and it was really not too much of a hassle.
Layer 1

Add the rhubarb jam

Layer 2

Hot from the oven
As you can see below, you can barely even see the rhubarb jam. It basically incorporated into the bar. I would have preferred a more distinct jam layer but these were still yummy.

These are super buttery and rich so definitely a once in a while treat!

Wednesday, April 18, 2012

Tuesdays with Dorie: Lemon Loaf Cake

Wow, so apparently I missed Tuesday. I made this cake before Easter and had my blog post written out in my head, but failed to actually write it, and now it is Wednesday. Oh well, better late than never, right?

Check out our hosts this week for the full recipe: Treats and The Beauty of Life. As I mentioned, I made this before Easter so I could take it to my family since I was planning to go home anyway. I typically don't care too much for lemon things so I didn't expect much from this. Looking over the recipe, it seemed pretty simple and straightforward, but I was surprised that there was only the zest from the lemons and no juice used.

Ready to go in the oven.
I made the recipe exactly as stated, as I generally do. I did have to use a slightly smaller loaf pan than stated because that's the only size I have. It turned out fine, but maybe a bit more curved at the top.


I thought this cake was pretty good. It is very similar to a pound cake with a hint of lemon. If it is going to be lemon, I think I would prefer more intense lemon taste and also a glaze icing. This was a big hit with my mom though, so I'm glad she liked it.

Sliced and ready to enjoy! Notice the flecks of lemon zest. 

Tuesday, April 3, 2012

Tuesdays with Dorie: Pizza Rustica

I missed the last recipe with being sick and St. Patrick's Day and all, so I was very excited to get back into it with this week's recipe--Pizza Rustica. Check out this week's hosts for the recipe:  Capital Region Dining and The Place They Call Home.
Having no idea of what this "pizza" would be like, I checked out the P&Q thread on TWD blog and saw that many people thought the crust was too sweet and many people used different filling ingredients. We eat mostly vegetarian so I planned on using spinach and mushrooms in my filling, but changed my mind when I found a locally-made pepperoni at the farmers' market. 
The pepperoni was unsliced and the recipe called for thinly sliced shredded prosciutto, so I just had my husband cut the pepperoni into thin slices and then cut into strips. I used ricotta from Trader Joe's, the remainder of a block of grocery store mozzarella, and parmigiano reggiano instead of romano. 
Even though I was concerned about the crust being too sweet, I made it as the recipe called for. I was surprised at how easy the crust was because I'm normally paranoid about my pie crusts. The whole pie came together pretty quickly. 
My husband and I were planning to eat this for dinner and I hadn't noticed that this was supposed to cool completely before served. I took it out of the oven, put it in the fridge for a few minutes, and when we couldn't wait anymore, we ate it. Yes, it was still hot, but delicious anyway. The pepperoni had a nice spice to it and both of us really enjoyed the sweet crust. Honestly I thought the bites at the edge of the pie with the most sweet crust were the best. My husband thought this was a keeper! We had it the next day for lunch cold and it was good that way too. 

Slice of pizza rustica, ready to eat! Local eggs with super yellow yolks contributed to the pretty yellow color. 
Check out the yummy local pepperoni in the filling. 

Tuesday, March 6, 2012

Tuesdays with Dorie: Rugelach

I'm going to make this short tonight since I'm suffering from a terrible cold.
I have never even thought about making rugelach before and even looking at this recipe, it didn't seem like something I would like since I generally don't care for things with dried fruits. I decided to make the lekvar using the recipe in the book. Since the book said the prune would make 1 cup and apricot would make 3/4 cup, I made them both, and like others, ended up with WAY more than I needed. I am not familiar with lekvar but I think this stuff tastes pretty good.
I used the dried apricots and prunes from Trader Joe's

Finished apricot and prune lekvar. 
This rugelach had a lot of steps so I made the lekvar and the dough a couple days in advance. I rolled out the dough as instructed and filled it. I didn't measure the lekvar, just covered the dough. Then added the cinnamon-sugar, nuts, and chopped dried fruit. I used the remaining prunes and apricots and also the dried cherry/berry mix from Trader Joe's. I know now that I should have chopped the fruit up smaller because the filling was way too thick for me to roll up easily. I ended up with more of a filled roll than a pinwheel. I rolled     as best as I could and stuck them in the fridge.
The next evening I prepared to cut and bake my rugelach. They were messy to cut as all the filling tried to seep out. I ended up with about 50 pieces in total, baked in two batches. I had a little filling come out as they baked but not too bad, fortunately. 
After they cooled a bit I tasted them and they are yummy! I like both the apricot and the prune--I really couldn't choose one over the other. These are rich and buttery, but addictive. I put most of them in the freezer to keep us from eating so many.
Finished rugelach. Yum!


Tuesday, February 21, 2012

Tuesdays with Dorie: Chocolate Truffle Tartlets


Time for the second recipe on Tuesdays with Dorie. This week we baked chocolate truffle tarts and our hosts are awhiskandaspoon, spikebakes, good eats n sweet treats, and cookbookhabit.

First I had to make the chocolate tart dough. I was glad to see there were directions for making the dough by hand, not just in a food processor. The directions said to make it on a smooth, preferably cold surface, so I made it right on the granite counter top. It was extremely messy but ultimately came together ok and cleaned up easily enough. I probably should have added a bit more ice water since it was still very crumbly when I wrapped it in plastic, but I thought it would become more cohesive after a chill.


Two days later I was ready to bake the tarts. I bought some mini tart pans just for this and I think they were 3 inches. When I rolled the dough out I had enough for 7 pans plus a bit left over. The dough was still crumbly, so I just rolled each piece into a ball, tried to roll it out flat, and then pressed it into the pan, patching as necessary. I found it a little difficult to press the dough into the pans with the bottoms out, but I just tried not to press too hard so the dough wouldn't push through the bottoms. I baked them and they set them aside to cool while I made the filling.

Tart shells ready for the oven.

The directions for the filling were pretty straight forward. The only thing I had a question about was how long to beat the eggs & sugar. Beating the yolk until they "form a slowly dissolving ribbon when the beater is lifted" doesn't really cut it for me as far as instructions are concerned. I had to stop a check a few times before I got to what I thought was the right consistency. 
I used ghirardelli bittersweet chocolate chips, callebaut white chocolate chunks (from the bulk section of the "health foods" store) and chopped Hershey's bars for the milk chocolate. The grocery store surprisingly didn't have any milk chocolate in the baking isle so I grabbed those Hershey's bars at the checkout. I used Nonna's biscotti and they were large so I used three and still thought maybe it was too much.

White chocolate, milk chocolate, and biscotti waiting to be mixed into the tart filling.

After the filling ingredients were all mixed, I used a 1/4 cup measure to scoop into the tart shells. I had a little left over so I baked the rest in a small dish. I baked them for about 18 minutes. They didn't look completely dry on top but I didn't want to overbake them. I had read from others that these were brownie-like, so I thought better to be under done than over. 
Finished tartlet
These came out really well. My husband and I split one, topped with a bit of whipped cream. Definitely rich and yummy! 
Chunks of white chocolate in the middle


Tuesday, February 7, 2012

Tuesdays with Dorie: The Beginning--White Loaves


I'm starting this blog primarily to follow along with the group on Tuesdays with Dorie. Tuesdays with Dorie is a group of bloggers who bake the same recipe every other Tuesday. I found out about the group after I received Dorie Greenspan's book Baking: From My Home to Yours and I was googling recipes before I made them. It was too late for me to join in then, but I was excited when I found out they were starting again with one of Dorie's older books Baking with Julia. I've developed an interest in baking and I thought this was a great way to challenge myself and make sure that I'm continuing to bake on a regular basis.

Our hosts this week are Laurie and Jules. The first recipe is great one to start with: White Loaves. I have to admit I haven't actually made real bread before. Sure, I've used a bread machine, but to bake a loaf from scratch with the rising, in the loaf pan, no, I've never done that. My baking leans toward the sweet category.

I won't post the recipe here, but check it out in Dorie's book. It is well worth the investment!

I was on a time crunch, as usual, when I started making this bread. I bought the only yeast in the grocery store and it turned out to be "fast rise," but that worked out ok since I was in a hurry. I used King Arthur "Special Bread Flour" from the bulk section of my health food market. Side note: that flour was less than $1/lb!

I got out my trusty KitchenAid and proofed the yeast as instructed. Then in with the first batch of flour and the water, then the rest of the flour. I turned the mixer on and it was fine at first, but as it churned, I noticed a burning smell, and it really looked like it was struggling. I turned it off for a bit, then back on, then off, just trying to give it some time to rest in between working.

Finally the kneading was done and my mixer was still standing. I formed the dough into a ball and sat it aside to rest. This was all pretty familiar me because I've made pizza dough several times before. Because I had used the quick rise yeast, the dough didn't need the full 45 minutes to double in size. It was ready in about half that time. I beat it down and pulled out half to form my first loaf. I had to re-read the instructions several times but once I got it, it was easy. I thought for sure the seam would turn out weird, but the loaves came out perfect. I baked them for about 30 minutes then took the loaves out of the pans to brown in the oven for about 10 more minutes. Only one minor imperfection--my loaves were not the same size. I guess I'll get better at portioning as I go along.

I gave the bread time to cool, but it was hard. Man, that bread smelled so good! When I cut into it, honestly I thought it seemed a little hard, and a little dense, but when I tasted it, yum! My husband loved it also. Now that I know baking my own bread is so (relatively) easy and so tasty, I don't think we'll be going back to the grocery store bread!

If you've been intimidated by making your own bread, I definitely recommend that you give this recipe a try.
The delicious finished product!